What I am Looking for in a Photo
I prefer hi-resolution digital photos. I do understand that many of my commissions are of animals that are no longer with us and for that reason we may have some limitations. I will work with you as best as I can!
It is hard to explain precisely what I am looking for as far as pose and angle goes, but I do recommend that you take a look through my galleries so that you get an idea about my style. I usually will only include an animal in a painting (sometimes I will put in a favorite toy). If the animal is leaning on a pillow, I will not include that pillow and it may look weird with their head just floating in the middle of the painting. This being said, really try to get a photo of the animal sitting by themselves.
Depending on the size of the canvas and the size of your dog I may or may not be including more than his or her head. Consider whether you would like me to paint just the head and shoulders or include the entire body.
The eyes are especially important. That's how I capture your pet's spirit and personality! I really like to see both eyes and it is absolutely essential that there is no glare in the eyes from a flash (see below section on lighting).
This applies to people who are pretty experienced in photography: I really need to see all of the details in the whole body (no blurriness). When you're messing with depth of field please consider this and use a smaller aperture if you can.
My favorite photos are of dogs sitting and looking directly at you. Any angles work but my favorite photos tend to be the ones where you are looking more directly at the dog as opposed to aiming down on the pet so that I can make the painting look like the animal is standing on the bottom of the canvas.
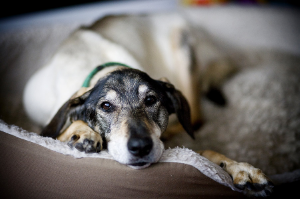
While this is an absolutely BEAUTIFUL photo, it has a couple issues when it comes to using it for one of my paintings. The dog is leaning on a dog bed and and the depth of field is too extreme for me to make out the details! (photo source: www.fidojournalism.com)
Here is an example of a photo that will work perfectly for me. The dog is looking directly into the camera, I can see his eyes well, I can make out all of the details, and this is a great angle! (Nice work Benji's mom!)
Photographing Your Pet
This is not as easy as you may think! Here are a list of pointers that I think will help to get a good photo and to explain better what I'm looking for in a photo. Smartphones these days are taking wonderful photos and they work perfectly fine for me.
1. Lighting
Lighting is especially important in your photos. If it's too dark you may be forced to use a flash and then the animal may have "red-eye" or a glare in their eyes. It is VERY hard for me to work from these types of photos. If the light is too bright then some of details may be lost and the shadows may be too extreme. The best solution is to find something in between. I usually recommend people take photos outdoors. The best type of light is when it is "diffused." You do not want direct sunlight so overcast days work the best. If there's an area (say, on a porch, or in a sunny room during the middle of the day) where there is plenty of light but the sun isn't shining directly into the room, this could work. So long as you don't have to use a flash! If you do end up taking the photo indoors, make sure the light is BEHIND YOU when you take the photo. If you try to take a photo of something with the light behind the animal, the animal will end up being very dark in the photo.
2. Metering an iPhone (lighting continued)
You may already know this but you may be about to learn a wonderful trick! This may work for other smartphones too but I'm not sure. When you're about to take a photo and you can see the imageon your screen, you can actually tap anywhere on your screen to "meter" the camera. "Metering" is a term all photographers know, which means that the camera is actually measuring the amount of light that is coming in so it can adjust its shutter speed and aperture to make sure it takes in just the right amount of light for the photograph. When you're taking a picture of your pet, you should "meter" the camera by touching the screen on the middle to darkest color ON your pet. Try playing around with this and metering the camera on different parts of the screen to get an idea of how the camera meters. Any time you're taking a photo on your phone (not necessarily of your pet), tap on the middle to darkest color on the screen. Since you'er taking a photo of your pet in this instance and the lighting is only important on them, tap on them until you find the best amount of light to take the photo.
3. Getting the Pet to look at the Camera
This is definitely one of the trickiest parts of this process and also wholly dependent on your pet. I am still learning more about how to do this (I am most definitely not a professional pet photographer). Things that I have found to work is to maybe hold a treat or a toy near the camera to grab their attention. Try putting your hand (palm facing out) on your forehead, and when you're about to take the photo and have the camera lined up and metered, lift your eyes slightly above the phone and look at them directly while you take the photo. Another thing that has worked for me is to make sudden loud/silly noises and immediately taking the photo when they look at you. I have also read the suggestion of putting the animal on top of a table so that they cannot really go anywhere (if you're dealing with a cat this may not work). Try having someone stand behind you to get his or her attention... but this may also just make the animal want to run towards that person. I have also seen photos where an extra person gets on the floor with the animal while you try to take the photo. If you have any suggestions I'd love to hear them! Of course there is always the option of hiring a professional photographer to take your photos. I am more than happy to work from these photos!
4. Taking photos with multiple animals
Before deciding on this you may want to consider doing a "series" as opposed to one portrait. I like to do series on square paintings, and they look awesome all hung up together!
If you think taking a photo of one animal is hard try doing it with two or three or four! There isn't too much I can advise you to do that you wouldn't already know. You know your animals better than me! However, if you can't get a good photo of them together, try taking multiple photos of them in the same position and if some of the photos have at least one of them looking at the camera I can usually peice them together. It's just really important to have photos of them together to see their relative size. I may even be able to take the head from another good photo you have and place it onto a body of a photo that you had with the animals together.
To put animals together that never actually lived at the same time it can get a little tricky. I may have to go off of your advice to get an idea of their relative sizes. The most important thing is that the photos will all have to have been taken at a very similar angle so that it will look like the animals are all sitting on the same surface.
I CANNOT work from this photo! The eyes are probably the most important part of the painting and the glare makes it impossible to see. (photo source: geometer.org)
This is an example of a photo with the light behind the subject. It makes it next to impossible to discern the details on the animal. You may try the meter in this instance, however. (photo source: thecreativecat.net)
Those who have black pets know how hard it can be to photograph them! The meter function on your camera is going to be your BEST FRIEND! It would be next to impossible to work from this photo. I cannot make out any of the details!
Clearly these two dogs are treat motivated! Try holding a treat or a toy right near the camera :)
If getting a photo of multiple pets together is hard to do, consider doing a series instead!
Here is an example of a painting I did that required me to piece together a couple of photos. I prefer not to do this, but if it is too difficult to get a good photo of multiple animals, I will do what I can!
This was a tricky painting because all of these dogs were not alive at the same time. I had to look through a TON of photos and communicate a lot with the client to make sure I had their relative size correct. Now all of the dogs get to hang out for the first time in this painting! How cool is that??
Hiring a Professional Photographer
I LOVE working with professional photographs. The paintings always turn out awesome! Pet photographers are certainly experts at what they do and can do such a wonderful job of capturing the perfect expression. Let them know you'll be needing a photo for me to paint from. The best part is, you'll not only have a wonderful Pawblo Picasso painting, but you will have some fabulous photos as well!
Here are some photographers I recommend from the Boston area. I welcome suggestions for photographers in different states if you have them!
Massachusetts Pet Photographers:
- Fred Levy: www.fredlevyart.com
- Li Ward of "Fat Orange Cat Studio": www.fatorangecatstudio.com


